Affiliate Disclaimer
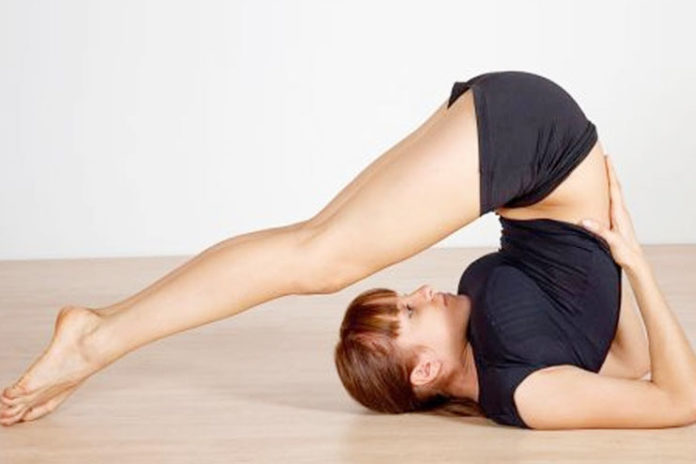
Some links in this article are affiliate links. We may earn a small commission if you make a purchase through these links, at no extra cost to you. We only recommend products we find useful to our readersHalasana (Plough Pose) is considered as one of the most advanced yoga pose, yet it is quite simple to practice as well as contains a lot of benefits. ‘Hala’ means ‘To Plough’ and ‘Asana’ means ‘To Pose’ in Sanskrit. So it is also known by the name of ‘Plough Pose’. ‘Plough’ is basically a popular agricultural instrument, that is being used to prepare the soil for sowing the seeds.
Plough or halasana is able to rejuvenate the inner parts and soul of your body as well as make it healthy again.
For women, because of all the compression in the pelvic area, this asana can help to improve the circulation as well as tone the reproductive organs, by increasing the efficiency. It can also help to strengthen the lower back as well as the sacral area, preventing from lower back pain during the menstruation.
Some of the highlighted benefits of halasana are:
If you regularly practice halasana, then you can avoid any lifestyle diseases like the obesity, diabetes, constipation, blood pressure, stomach disorders as well as menstrual disorders.
When you are turning old, the back bone can lose the elasticity and then turns stiff. As long as it maintains the elasticity you will be healthy. By practising halasana, it can help you to keep your back bone flexible even at the old age.
So, here are some steps and benefits of halasana (Plough Pose), that you can try.
Halasana (Plough Pose) For Constipation
Steps:
1. After completing Salamba Sarvangasana (Supported Shoulder Stand), slowly exhale and bend from your hip joints to lower the toes to the floor above your head. Try to keep the torso perpendicular from the floor and the legs completely extended.
2. With the toes touching floor, try to lift the top thighs and the tailbone toward the ceiling and then try to draw the inner groins deep in the pelvis. Now try to imagine that the torso is hanging from the height of the groins. Then continue to draw the chin away from the sternum as well as soften the throat.
3. You can continue to press the hands against back of the torso, try pushing your back up toward the ceiling as you try to press the back of your upper arms down, on the support. Or you can even release the hands away from the back as well as stretch the arms out behind the floor, opposite of your legs. Try to clasp your hands together and press your arms actively down on a support, as you try to lift the thighs toward ceiling.
4. Halasana (Plough Pose) is basically performed after the Sarvangasana from one to five minutes. To exit this pose first bring the hands on the back again, lift back in the Sarvangasana pose while exhaling, then slowly rolling down on the back, or simply rolling out from the pose for an exhalation.
Meditation For Health And Peace (Read Here)
Do:
a. Always keep your legs straight from the knees with the toes vertical from the ground over the head.
b. Legs must be in straight line.
c. As much as possible, the back must remain straight as well as vertical.
d. Arms must be straight with the palms on ground.
e. Shoulders must be resting on the ground with the shoulder baldes taking the weight and less from the neck.
f. The chin must rest against the chest.
Don’t:
a. Try to avoid bending your knees.
b. Never move your neck or overstrain it into a chin lock position.
c. Try not to move while doing this asana, as a lot of stress is put on your spine.
Contraindications and Cautions:
a. Do not perform if you are having diarrhea
b. When in menstruation, try to avoid this asana
c. If have any neck injury, avoid this asana
d. If you have asthma & high blood pressure, then you can practice halasana with your legs being supported on the props.
e. Try to avoid this asana if you are pregnant.
f. This pose is considered to be from intermediate to advanced stage. It is also not advisable to perform this pose in a way without any prior experience or unless you are having the supervision of an instructor.
Deepen the Pose:
While doing this pose, you can try to squeeze the shoulder blades together to help lifting yourself up on the tops of the shoulder. But once when situated in a position, try to broaden your shoulder blades across the back, in the resistance of the outside of the upper arms.
Nauli Kriya For Abdomen Health (Read Here)
Beginner’s Tip:
In this pose, there is always a tendency to overstretch the neck by pulling your shoulders too far from the ears. While the top of the shoulders must push down in the support, they must also be lifted slightly toward the ears and keep the back of your neck as well as throat soft. Try to open the sternum by keeping the shoulder blades firm against the back.
If it is becoming very hard to lift the waist then practice by placing the pillows under your waist. Those who are unable to touch the floor with their big toes, then they can practice it placing their big toes on the chair for few days. In the beginning while you are practicing halasana, it is also possible to feel a little pain in the lower part of your back. Do not worry, remember to practice regularly as the pain can disappear quite very quickly.
Benefits:
a. This asana helps to calm the mind.
b. It can also help to stimulate the abdominal organs as well as the thyroid gland
c. It can help to stretch the shoulders and the spine
d. It can help to give relief from the symptoms of menopause
e. It can help to reduce the stress as well as fatigue
f. It is considered as a therapeutic treatment for backache, infertility, headache, insomnia, and sinusitis
g. It can help to clear off all the constipation as well as stomach disorders.
h. Halasana can help to reduce both belly and body fat
i. The inner organs like kidney, thyroid, spleen and pancreas get properly nourished as well.
j. It can help to normalize the high blood pressure.
k. It can help to improve the brain or memory power.
l. As more amount of blood flows to the face, the face starts dazzling as well as keep it young.
m. The muscle fibers as well as cervical vertebrae, the Thoracic vertebrae and Lumbar vertebrae on your back are being strengthened.
n. It also help to keep the back bone flexible as well as strong.
Preparatory poses:
You can start this halasana after:
a. Sarvangasana (Shoulder Stand Pose)
b. Viparit Karni (Up-side Down Pose)
c. Ashwini Mudra (Gesture Horse Yoga)
Follow up poses:
After the Halasana you can work on:
a. Vistrut Pada Halasana
b. Karnapeedanasana (Folded Plough Pose)
c. Matsyasana (Fish Pose) – to balance the Jalandhar Bandha
d. Chakrasana (Wheel Pose)
For more benefits
Neti For Respiratory Problems (Read Here)


